How to Effectively Use Glitter Powder in Crafts and DIY Projects?
When it comes to crafting, Glitter Powder can elevate any project. According to a report by Craft Trends 2023, the demand for decorative materials like Glitter Powder has surged by 40% over the past year. This reflects a growing interest in DIY culture and creative expression. Experts in the industry, such as Dr. Emily Thompson, emphasize the importance of quality in selecting glitter. "Not all glitter is created equal," she states.
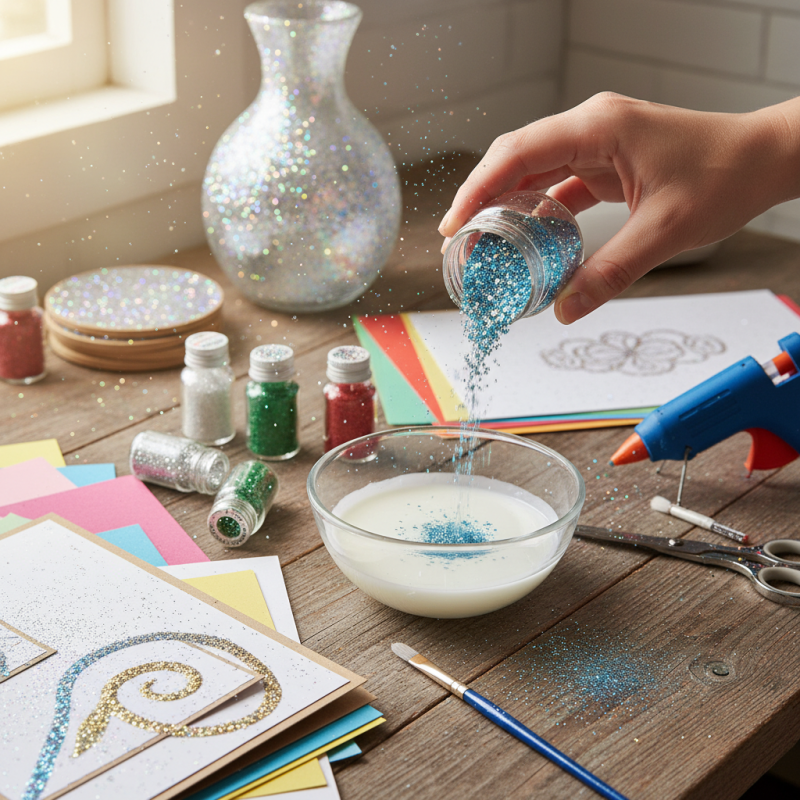
Glitter Powder brings vibrancy and sparkle to various crafts, from card-making to home décor. However, not all projects can handle its use effectively. The right technique is crucial. For instance, mixing Glitter Powder with adhesive can create a more durable finish. Yet, it can be messy, and achieving a balanced look may require practice. Understanding the various types of Glitter Powder available is essential for any DIY enthusiast.
While Glitter Powder can enhance visual appeal, it also poses challenges, like environmental concerns. Many crafters are navigating the fine line between creativity and sustainability. As the crafting world evolves, it’s essential to keep experimenting and reflecting on how to best incorporate Glitter Powder in a meaningful way.
Types of Glitter Powder: An Overview for Craft Enthusiasts
When diving into the world of glitter powder, understanding the types available is essential for any craft enthusiast. Glitter powder comes in various forms, each offering unique uses in projects. For example, fine glitter creates a subtle shimmer on paper crafts. Coarse glitter, on the other hand, adds a bold texture to three-dimensional objects. Iridescent glitter reflects light differently, providing a magical touch to festive decorations.
Different materials affect how glitter appears on surfaces. Plastic glitter is inexpensive but can shed easily. Biodegradable glitter, made from natural materials, is a great eco-friendly alternative. However, it often comes with a higher price tag. Crafting with chunky glitter can sometimes lead to uneven coverage. It may require more adhesive or layering to achieve that desired look.
Experimenting with various types can lead to surprising results, but not every combination will work perfectly. A project intended for a party might not translate well to a more elegant design. Embrace the imperfections. Each experience enhances your skills and creativity. By learning from mistakes, you'll gain a better understanding of how to effectively incorporate glitter powder into your crafts.
Types of Glitter Powder Used in Crafts and DIY Projects
Choosing the Right Adhesive for Glitter Application
Choosing the right adhesive for glitter application can greatly impact your craft projects. An effective adhesive not only holds glitter securely but also enhances its visual appeal. According to industry research, glitter-related craft supplies generate approximately $1 billion in sales annually. This reveals a huge interest in creating visually stunning projects.
When selecting an adhesive, consider the project type. PVA glue is versatile. It dries clear and is suitable for most surfaces. Spray adhesive, however, offers an even coating and is great for larger areas. While working with spray adhesives, one must manage overspray and fumes. This can pose a challenge, especially for indoor projects.
Don’t underestimate the importance of testing your adhesive. Some glitters may react differently. For instance, fine glitter often requires a heavier adhesive layer. On the other hand, chunky glitter may need a thicker base for best results. Always experiment on scrap materials before your final piece. Evaluating adhesion strength can save time and materials in the long run. Remember, even experienced crafters encounter setbacks; learning through trial and error is part of the creative journey.
Techniques for Applying Glitter Powder in DIY Projects
When using glitter powder in DIY projects, application techniques can greatly impact the final result. A popular method is using a glue stick or spray adhesive. This ensures an even and consistent layer of glitter. After applying the adhesive, sprinkle glitter onto the wet surface. Make sure to cover all areas completely. If any spots are missed, the final look may not be as stunning.
Another technique involves using double-sided tape. Cut the tape to fit your design, then peel off one side and press it onto your project. After that, sprinkle glitter over the exposed tape. This method is clean and gives you more control over shapes. You can use this for intricate designs, but it requires precision. Mistakes may happen, leading to uneven glitter patches.
Lastly, consider using a brush for precise applications. Dip a clean brush into your glitter powder, then gently dab it onto the desired area. This technique works well for small details. However, it can become messy, so have a cleanup plan. Often, you’ll find excess glitter that doesn't stick. Embrace these imperfections; they can add character to your project. Experiment with these methods to see which one resonates with your style.
How to Effectively Use Glitter Powder in Crafts and DIY Projects?
| Technique | Materials Needed | Application Method | Best For |
| Direct Pouring | Glitter powder, adhesive | Sprinkle glitter directly on wet adhesive | Paper crafts, card making |
| Glitter Glue | Glitter glue, paintbrush | Use a brush to apply glitter glue | Kids' crafts, small projects |
| Mod Podge Technique | Mod Podge, glitter, brush | Mix glitter into Mod Podge and apply | Home decor, photo frames |
| Spray Adhesive | Spray adhesive, glitter | Spray adhesive onto surface, sprinkle glitter | Large surfaces, glitter projects |
| Resin Pour | Epoxy resin, glitter | Mix glitter into resin before pouring | Jewelry making, coasters |
Creative Ideas for Incorporating Glitter in Crafts
Glitter can transform ordinary crafts into stunning, eye-catching pieces. One idea is to use glitter powder for homemade greeting cards. Apply a layer of glue in your favorite pattern, then sprinkle glitter over it. This technique adds depth and sparkle that plain cards lack. However, the application can be messy. Be prepared for some cleanup afterward.
Consider incorporating glitter into picture frames. A simple wooden frame can be revitalized with a dusting of glitter along the edges. Choose a color that complements your photos. The result will be a personal touch that enhances your decor. Remember to seal the finished frame with a clear spray to prevent glitter fallout.
If you’re exploring three-dimensional projects, try adding glitter to clay creations. Mixing glitter into the clay before shaping can create intriguing effects. Yet, it might take a few tries to get the right consistency. It is important to test small batches first. Results may vary, and patience is key. Embrace the imperfections as you experiment with colors and textures.
Tips for Cleaning Up and Storing Glitter Safely
Cleaning up glitter can be a challenge. It gets everywhere, sticking to surfaces and clothes. Start by using a damp paper towel to pick up larger clumps. This method is quick and effective. For fine particles that escape, use sticky tape to lift them off surfaces. It’s satisfying to see your workspace free of glitter.
Storing glitter properly is crucial to avoid mess in future projects. Use airtight containers to keep dust out. Clear jars work well, allowing you to view your collection. Label each jar for easy access. Sometimes, you might find glitter spilling in transport. Reflecting on how you store it can lead to better organization. Regularly check your supplies. This can help ensure that old, dried-out glitter doesn't mix with your new stash.